BAKED CHOCOLATE-GLAZED DONUTS WITH ORANGE & ALMOND

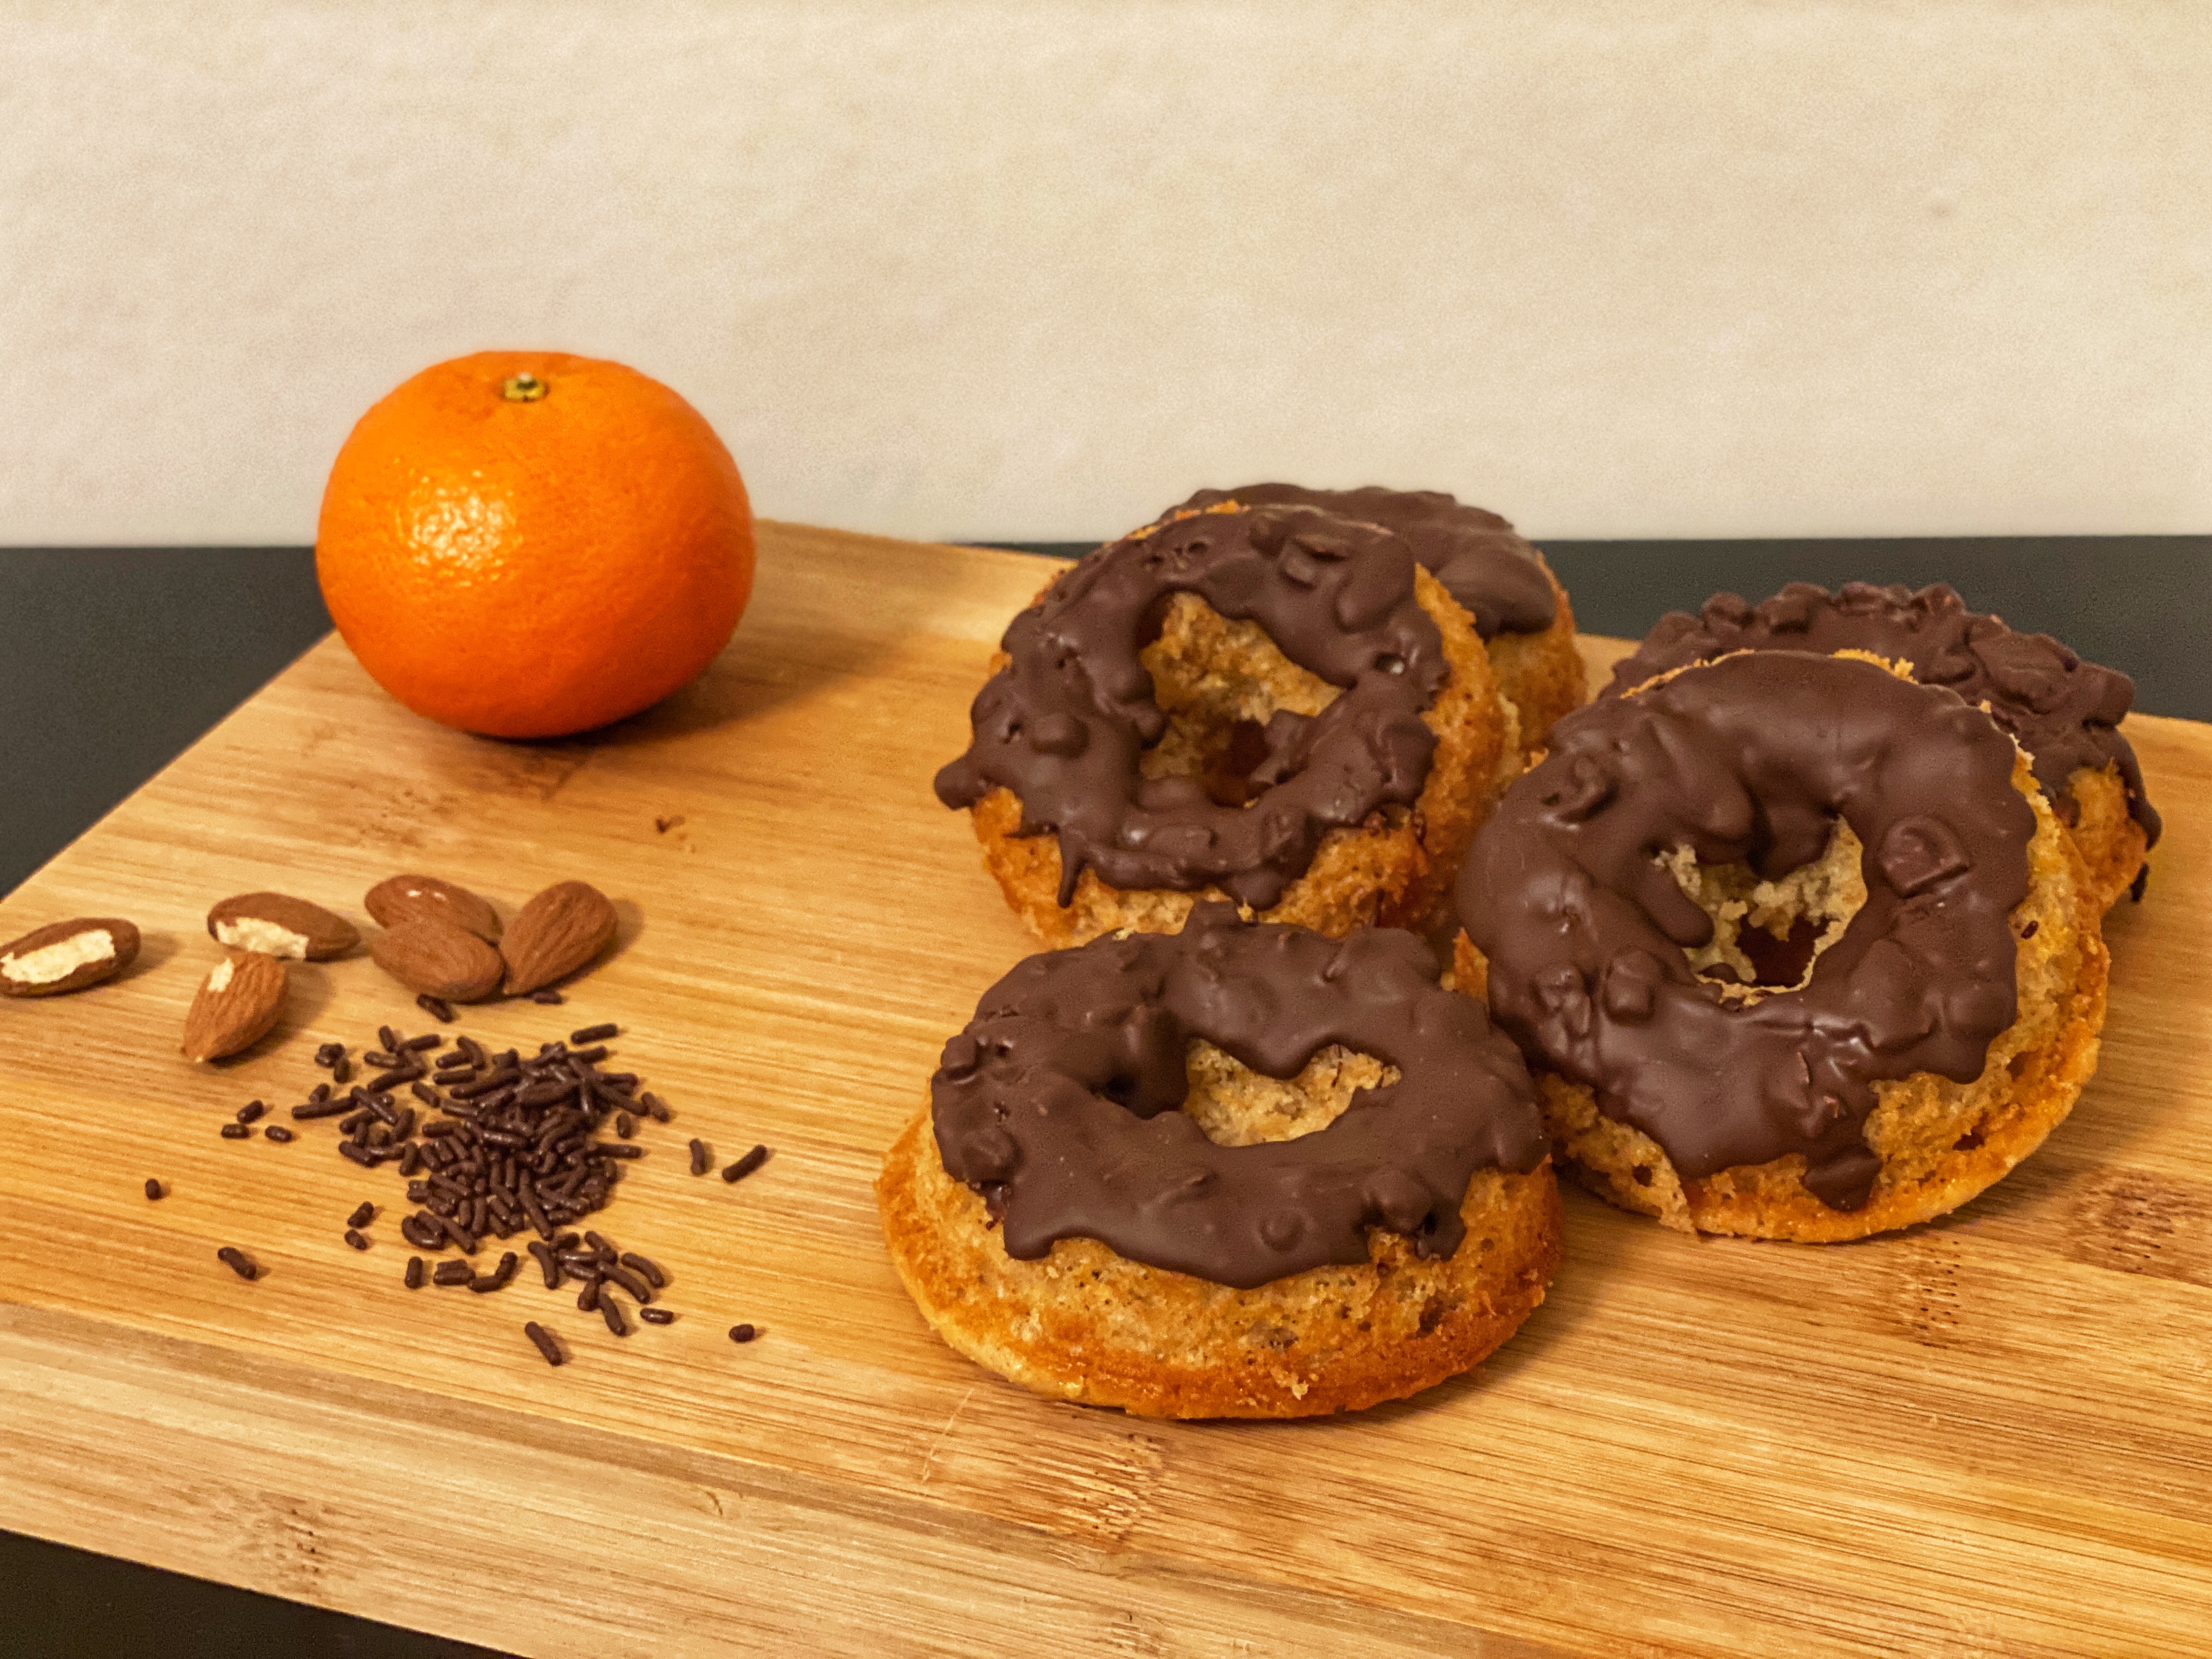
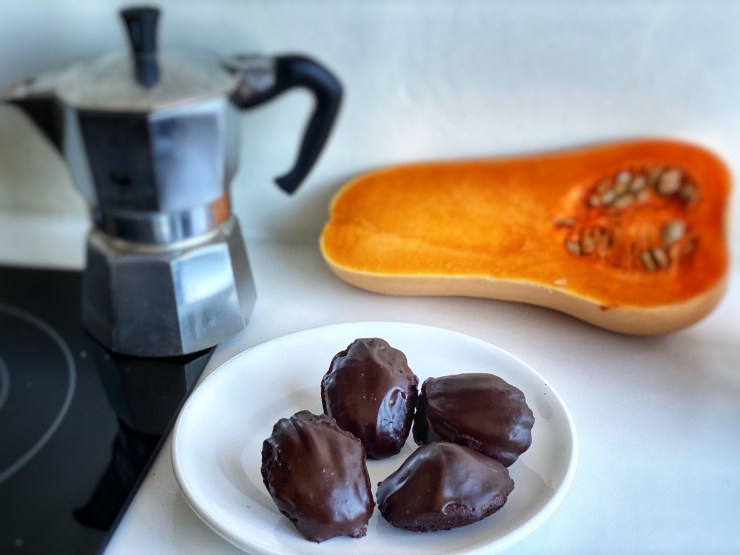
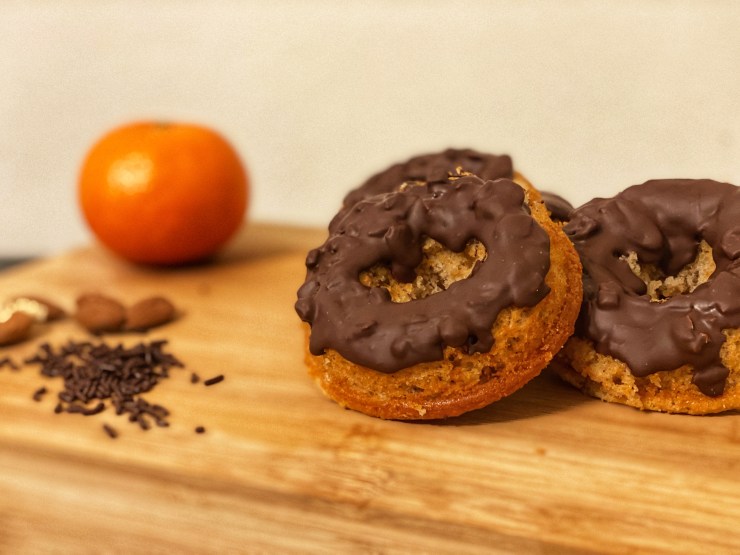
These fluffy, oven-baked donuts are perfect for a cozy treat 🍩✨—light yet indulgent, and topped with a luscious dark chocolate glaze with orange zest and almonds 🍫🍊. Whether you make 6 large donuts or 12 mini ones, they’re bound to disappear fast!

InstaRecipe

Ingredients

For the donuts (makes 6 large or 12 mini donuts):

  • 125 g all-purpose flour
  • 1 tsp baking powder
  • 75 g sugar
  • 8 g vanilla sugar (or a few drops of vanilla extract)
  • 1 pinch of salt
  • 1 egg
  • 125 ml milk (lactose-free works great!)
  • 30 g vegetable oil

For the glaze:

  • 100 g dark chocolate with orange zest and almonds (I love the Lindt bar!)
    or
  • 100 g dark chocolate + zest of 1 orange + a handful of finely chopped almonds

Procedure

  1. Preheat your oven to 190°C (375°F). Lightly spray your donut pan with baking spray or grease it well.
  2. In a mixing bowl, beat the egg with sugar and vanilla sugar (or vanilla extract) until light and fluffy. Add in the milk and oil, and mix well. In a separate bowl, sift together the flour, baking powder, and salt. Pour the wet mixture into the dry ingredients and whisk until smooth and lump-free.
  3. Pour the batter evenly into the prepared donut tray. Fill each cavity about ¾ full to allow room for rising.
  4. Bake in the preheated oven for about 15 minutes, or until the donuts are golden and spring back when touched. Let them cool in the pan for a few minutes, then transfer to a wire rack to cool completely.
  5. Prepare the glaze. Melt the chocolate gently using a bain-marie (double boiler). If you’re using plain dark chocolate, stir in the orange zest and chopped almonds once fully melted.
  6. Once the donuts are completely cool, dip the tops into the chocolate glaze. Let any excess drip off before setting them back on the rack.
  7. Let set (or not!). Allow the glaze to set slightly before serving—if you can wait that long.

Enjoy!

AFTER 10, BACK TO 1!

Who needs 11 when you can just restart? Year 1 (but with 10 years of experience)!

Last Friday, March 7, this culinary food adventure turned 11, and this time, it happened quite shortly after this year’s Fat Tuesday, which was originally the day when this foodblog started, back in 2014. As I already mentioned last year during the 10-year anniversary celebrations, I cannot believe how much time has passed and how many recipes and food stories have been shared through the years, from different countries.(if you just landed here and are curious, you can check the about me section).

I have to say, this past year I have not been very productive baking-wise, and I also have to admit that quite a few times, despite my wish to bake something, it all ended up in the bin because I messed something up, and nothing edible came out of my baking experiments. It happens! At the end of the day, baking requires practice and perseverance, even if it’s just a hobby. So, from the wisdom of these 10+1 years, I can say this was a good learning experience for the year ahead!

Happy baking, and let’s celebrate with these simple lemon muffins, which, according to the tasters, turned out tasty—simplicity always wins!

LEMON MUFFINS

Ingredients

  • 240 g flour
  • 100 g sugar (I used 8 g of vanilla sugar + the rest normal sugar)
  • 100 ml milk
  • 1 lemon (both zest and juice)
  • 100 g seed oil (I use sunflower oil)
  • 2 eggs
  • 8 g baking powder (half a packet)

For the glaze

  • 6 teaspoons lemon juice (about half a lemon)
  • 70 g powdered sugar
  • Colored sugar decorations for garnish (optional)

Prepare the muffins

In a bowl, beat the eggs with the sugar until you get a foamy mixture. Then add the oil, milk, and lemon juice.
In a separate bowl, sift together the flour and baking powder, then add the lemon zest.
Fill the muffin molds about 2/3 full.
Bake in a preheated static oven at 180°C (350°F) for 15-20 minutes, or until a toothpick inserted into the center comes out clean.


Prepare the lemon glaze

In a small bowl, mix the powdered sugar with the lemon juice, adding the juice gradually. Stir with a spoon or whisk until you get a smooth and fluid consistency.


Decorate the muffins and enjoy!

Once the muffins are completely cooled, spoon the glaze over the top of each muffin.
Decorate as desired with colored sugar decorations or simply with a small lemon wedge.

Enjoy! 🍋🧁

Down the memory lane:
Aroma di Cannella through the years

SINTERGLAASJES

In Tulipland, tonight is a big one ‘cos it’s pakjes avond, or the ‘present night’ concluding the Sinterklaas celebrations, generally regarded as the Dutch equivalent of Christmas (or an occasion for a double-Xmas?) 

Which also means, you have probably eaten a lot of kruidnoten (i.e., the the hard cookie-like confectionery flavored with speculaas) and chocolate for days.  And yet, you have quite a few of such delicacies left and need to clear the cupboard up fast to make space for the upcoming Xmas sweets, like the kerststol (i.e., the traditional Dutch oval-shaped fruited Christmas bread) 

 Dutch-culinary lessons apart, here a kruidnoten & chocolate clear-up idea for a nice and relatevily health(ier) dessert to close off your Sinterklaas celebrations with family and friends: I called them Sinterglaasjes, made with low-fat (healthier, right?) quark, kruidnoten crumble, raisins and chocolate! 

InstaRecipe

Ingredients per glass

• 125 gr quark cream – made by mixing low-fat and lactose-free quark (for me) with 1-2 tbs of milk to make the quark a bit creamer
• 4 tbs kruitnoten crumble – made by crumbling using a mixer or Italian old-fashion pizza roller
• 1 tbs dark or milk chocolate finely chopped
• 1 tbs raisins (better if previously let soaking in some water)

Procedure

In a glass, alternate the ingredients in layers as follow: half quark cream; 2 tbs kruidnoten crumblIe; raisins; remaining quark cream; 2 tbs kruidnoten crumble; chocolate.

Klaar!

CHOCOLATE-PUMPKIN MADELEINES

And it’s that time of the year 🎃 it’s time for the 🟠Pumpkin Series🟠

As some of you might know, I’m a big fan of pumpkin! Yet, when I was younger, I really didn’t like it…with time I’ve learnt how to appreciate it and use it in so many preparations!

So let’s get started with a newbie recipe from the @aroma_di_cannella’s repertoire: CHOCOLATE-PUMPKIN MADELEINES 😋

For the skeptical palates, these madeleines are a good introduction to enjoy a very nice (and #lactosefree!) sweet treat made of pumpkin. And no worries, you’ll barely taste it with the predominant flavor of chocolate, enriched by a light pinch of cinnamon. But trust me, the pumpkin is in there 😉

Enjoy! 🎃

InstaRecipe

Ingredients (for 25 madeleines)

250 gr pumkin
80 gr sunflower oil (or mixed seeds or equivalent of butter)
2 eggs
100 gr brown sugar
8 gr vanilla sugar
130 gr flour 00
30 gr unsweetened cocoa powder
10 gr baking powder
Pinch of salt
Cinnamon

For the chocolate glaze
80 gr fresh cream
80 gr dark chocolate (or milk chocolate if you want a sweeter taste)

Procedure

Start with chopping the pumpkin and steam-cook it until it softens. Then, blend it together with oil.
In a bowl, whisk the eggs with the sugars and salt, then add the pumpkin & oil mix, followed by the flour, baking powder, cocoa powder and cinnamon. Stir all ingredients until well combined.
Pour the batter (approx 2 tbs) on a madeleines tin. Bake in preheated (static) oven 200°C for 12/13 minutes.

In the meantime, prepare the glaze. Heat the cream until almost boiling. Then, add the chocolate and stir well until it melts. The glaze should be smooth and dense.

Let the madeleines cool down before dipping them in the glaze.

GNOCCHI AL SALMONE

In the Italian language, we have some weird sounds like GL and GN that are particularly hard to pronounce for not native speakers. Think how difficult it can be to say GLI GNOCCHI (🤯), when referring to those super yummy, belly-filling potato dumplings 🥔
It took me quite some time to have my Dutch bf saying it right but with practice it’s very much possible 💪

Little #italianlesson 🇮🇹

To pronounce

•GLI

  1. put the tongue against your palate while slightly touching the sides of your 🦷
  2. put on your best smile
  3. make a snake-y 🐍 sounds by letting the air come out from the sides of your tongue 👅
  4. At the end, don’t forget to add “i” like you say in the word Italy

•GNOCCHI

  1. GNO is like “nyo” but with a N sound like when you are 🤧 so a nasal N (like in the word THING: Think about that ING sound, with silent G).
  2. CHI is no like 🇨🇳🧘🏻‍♀️ but hard KI
  3. Remember we have plural (hard) C
  4. Put all together ➡️ NYOK-KI

So what are we having tonight?

GLI GNOCCHI AL SALMONE 🙃🐟

Recipe (for 2 people)

You need:
400-440 gr gnocchi
200 gr salmon (chopped into cubes)
olive oil
salt & pepper to taste
fresh parsley

Procedure

In a big pot, heat the water for the gnocchi (and please, add the salt only after the water starts boiling🙏😉). Cook the spaghetti as indicated in the package.
In the meantime, in a pan cook the salmon with some olive oil and then add salt & pepper to taste.
When it’s ready, you can cook the gnocchi as it usually takes 2/4 minutes (check the package). Drain the gnocchi and pour them in the pan with the salmon, add some fresh parsley and stir for a couple of minutes on medium heat.

Buon appetito! 😋

TORTA 30 2.0

Happy baking, happy birthday!

People who know me know how much it makes me happy to make people happy by baking a cake for their birthday. (Now, I challenge you to read this sentence fast at least 3 times, let’s see if you manage! 😉 )
And it’s even better when, besides looking pretty, the cake is also very appreciated for its yummy taste!

It’s time to make the sweet half happy with his special request inspired by the Torta 30, which here is presented in a – I must say – even better version: a super tasty, fresh lemon-flavored Victoria Sandwich (Victoria sponge cake) with lemon cream & strawberries filling. So here we go with the Torta 30 2.0 (which might -or might not!- hide some hints about the special birthday number).

TORTA 30 2.0

Ingredients

For the lemon-flavored Victoria Sandwich (baking tin 20 cm):

50 gr sunflower oil
125 gr milk (or plant-based drink like almond milk)
8 gr vanilla sugar
90 gr sugar
170 gr baking flour
10 gr baking powder
70 gr egg whites (about 2 eggs)
1 lemon zest and 2 tbs of its juice
pinch of salt

For the lemon cream:

2 egg yolks
40 gr corn starch
60 gr sugar
5 gr vanilla sugar
250 ml almond milk (or regular milk)
1 lemon 

For the lemon syrup:

1 cup of hot water
1 tbs brown sugar
juice of 1 lemon

In addition, for the final decorations you need:

200 gr whipped cream
300 gr strawberries
nougatine (brown nougat made from caramelized sugar)
almond flakes
1/2 lemon slices 


Procedure

Prepare the the Victoria sandwich like I did here. Only thing to remember at the beginning is to add the lemon juice to the oil, sugars and milk mix. This key step will make the Victoria sponge tastes like fresh lemons.

In the meantime, prepare the lemon cream as described in this post. For the lemon syrup, instead, heat 1 cup of water with the sugar. After it is about to boil, remove from the heat and add the lemon juice. Stir and let it cool down completely and rest.

For assembling the cake, start with cutting the cake horizontally in two parts. Brush the lower cake layer with the lemon syrup liquid. Then, spread the 2/3 of lemon cream on top and remember to keep 1/3 for the decoration (see below). Add the diced strawberries (keep 3 nice strawberries for the final decoration). Add the top part of the cake, brush it with the syrup and cover the whole cake with a thin layer of whipped cream. Store the cake in the fridge for the night.

Decoration time! Spread the almond flakes on the side of the cake, while the nougatine goes on the top. With a sac à poche, draw some small roses with the lemon cream leftover. Place some small lemon slices between the roses. Last, cut the strawberries in half and place then at the center of the cake. Place the cake back in the fridge for at least half a day (the more you wait to eat it – if you manage! – the better).

Enjoy!